
How does XProxy work?
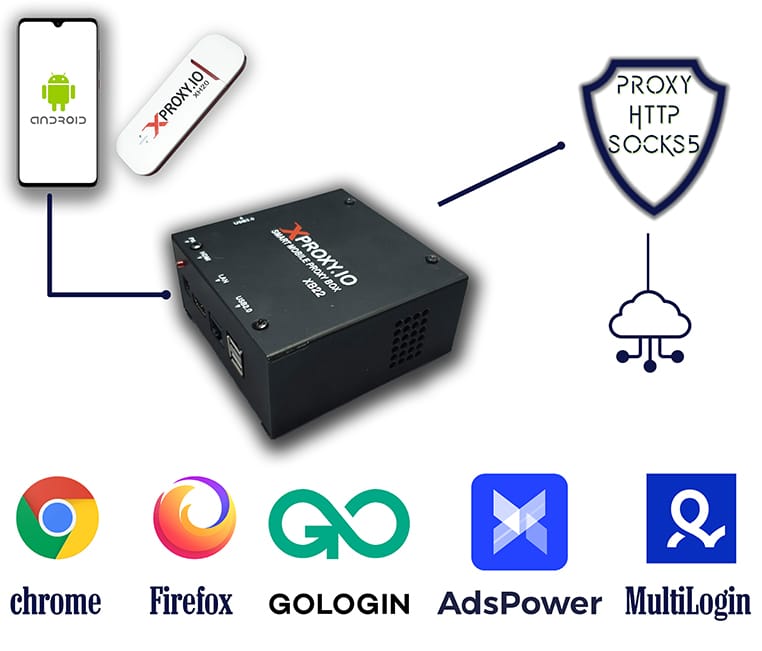
XProxy software needs 5 parts to work:
- Server proxy: XProxy Box or any Ubuntu PC 64-bit.
- 4G dongle/ 4G USB/ 4G AirCard/ Android Phones.
- USB Hub to expand usb slots for many dongles plugging.
- SIM cards with data plan.
- High speed internet service if you want to use on outside.
For more information about hardware setup, you can get more information here
XProxy will connect directly to dongles and make http/socks5 proxies with standard RFC specifications.
XProxy is fully compatible with any software, library development, anti fingerprint browser such as Clonbrowser, Multilogin, Adspower, Gologin,... One thing required it is support http/socks5 proxies.
For more information about features supported, you can get more information here.
Hardware Setup Steps
- Connect XProxy box/Ubuntu server to Internet Modem via Ethernet cable.
- Connect USB HUB to XProxy box/Ubuntu server.
- Add SIM Cards to dongles and plug dongles to USB HUB.
- Power up XProxy box, USB HUB.
- Identify the IP of your host device from your router and access it directly from any device within the local network.
Install XProxy software on Ubuntu PC
Ignore this section if you purchased the XProxy XB22 pre-installed XProxy software before shipment.
- Hardware requirements & setup:
- Minimum 2G RAM, 64 bits CPU supported.
- Ubuntu Desktop version 18.04 LTS to 22.04 LTS (64 bits version).
recommend one: Ubuntu Desktop 22.04.1 ISO.
- Tutorial here: Ubuntu Setup Guide.
Noted in step 6: Advanced Features leave default: None.
- Open Terminal & run as
rootuser:sudo su - Install required library:
apt-get update && apt-get install curl -y - Install XProxy software:
curl -s https://x-proxy.io/install | bash- The software will be installed in few minutes depend on hardware and network speed.
- The server will be rebooted when installation done.
- Access to panel:
- You can access to panel on this server by address: http://localhost
- You can connect to panel via LAN IP address or forwarding port to use on outside your home.
- The default XProxy software installed on Linux PC has not activated yet.
You need to activate it to use the full features of XProxy.
Don't forget to subscribe Free, Basic, Premium, Business plan to speed up your business.
You can get more information about subscription plans here.
License Activation
All XProxy boxes are pre-installed with a free version and a lifetime commitment. Please review the comparison table of Free, Basic, Premium, Business Subscriptions.
- Go to XProxy panel on your server and then go to System Information.
- Copy License key & Subscription Secret key.
- Sign in to XProxy Console.
- Navigate to My Devices.
- Click New Device and fill License key & Subscription Secret key have copied at step #2.
- By default, the added device will be registered for the Free plan.
You can upgrade subscription by clicking Purchase Plan to select new plan.